How to Block an Email Address in Outlook [2025]
Table of contents
Does it ever seem like your Outlook inbox is perpetually flooded with so many emails? From promotional offers and relentless spam to maybe emails from individuals you’d much rather avoid.
In case you do not delete such emails, they tend to occupy storage space and clutter up your inbox—especially if they keep piling over time. They also make it difficult to search for essential information.
Fortunately, Outlook provides a straightforward solution: blocking unwanted email addresses. By blocking these email IDs, you can get rid of emails you no longer want in your mailbox.
In this article, we will walk through the various ways to block an email address in Outlook, especially in the desktop and web editions, and on your smartphone.
Table of Contents
- Why block an email on Outlook?
- How to Block an Email Address in Outlook: Step-by-Step Guide
- How to Manage Blocked Senders
- Wrapping Up
Why block an email on Outlook?
Blocking an e-mail address on Outlook is necessary to keep your inbox functional and clean. Picture this: a service sends you an email every day of the week even though you discontinued it long ago, or you are plagued by spam emails promoting products that you would never have a use for.
If you have multiple Outlook accounts, this could kill the purpose of having them—which is to keep all your digital communications segregated. Instead, this would make all your accounts equally crowded.
Not only are these messages a waste of your time, but they also pose a real threat if you accidentally click a link in one of them.
To a large extent, these risks can be filtered when you limit the number of senders you allow access to your inbox.All in all, blocking an email address enables you to manage the clutter and noise of unwanted emails and makes the most important messages easier to find and respond to.
How to Block an Email Address in Outlook: Step-by-Step Guide
Blocking an email address in Outlook is a breeze, but it’s crucial to note that the process can vary slightly depending on the platform you’re using. Whether you’re using Outlook on your desktop, accessing it via the web, or using the mobile app, we’ve got all bases covered.
Let’s check out the steps to block unwanted emails for each of them:
Blocking Emails in Outlook on Desktop:
- Open Outlook on your desktop and head over to your inbox.
- Locate the email from the sender you want to block.
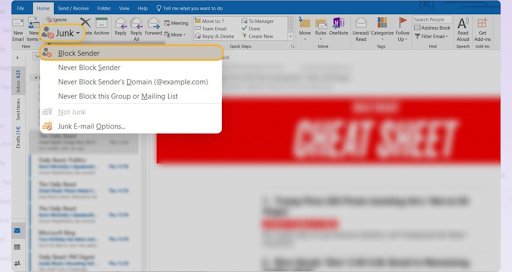
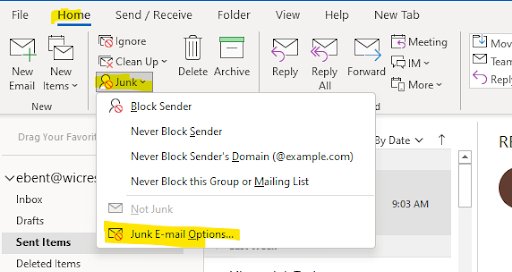
- Right-click on the email and select ‘Junk’ from the dropdown menu.
- Click on ‘Block Sender.’ A confirmation message will appear, and just like that, the sender is added to your blocked list.
Blocking Emails in Outlook on Web (Outlook.com):
- Log in to your Outlook account through your preferred web browser.
- Look up the email from the sender you wish to block and open it.
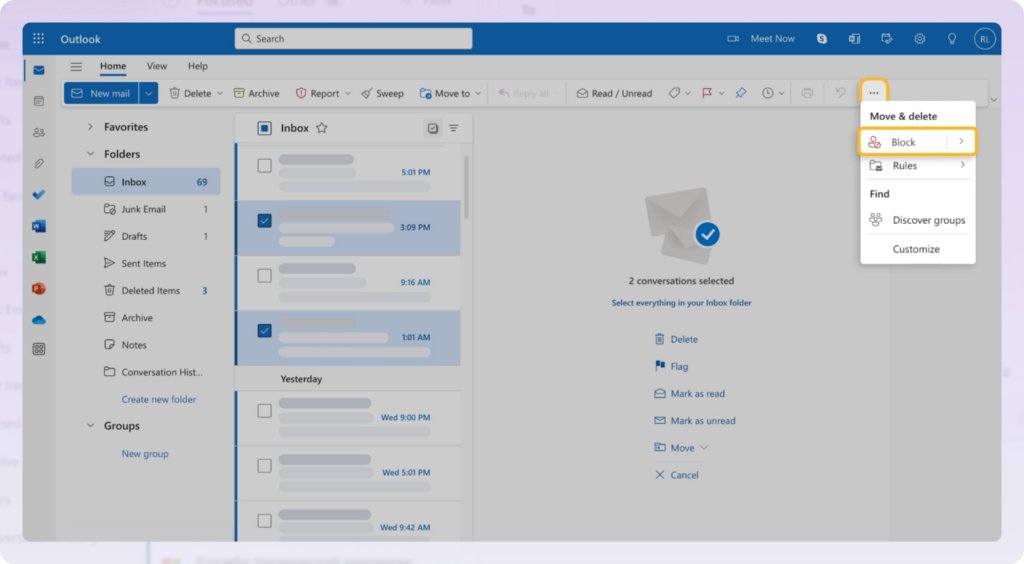
- Click on the three dots (More actions) in the top right corner of the email.
- Select ‘Block’ and confirm the action.
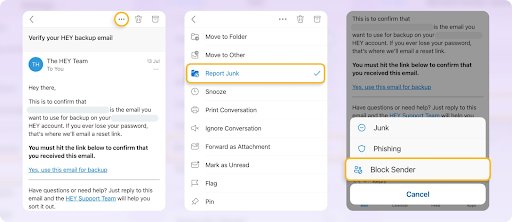
Blocking Emails in Outlook on Mobile:
- Launch the Outlook app on your mobile device.
- Tap on the email from the sender you want to block.
- Tap on the three dots (More options) in the top right corner.
- Choose ‘Move to Junk’ or ‘Block,’ depending on your app version.
How to Manage Blocked Senders
After you’ve blocked a few email addresses, it becomes essential to know how to manage your Outlook’s blocked senders list. Outlook makes it remarkably simple to review, edit, and even unblock senders if you ever have a change of heart.
Viewing Blocked Senders List In Outlook:
- In Outlook on Desktop, navigate to ‘Home’ and click on ‘Junk’ > ‘Junk Email Options.’
- Head over to the ‘Blocked Senders’ tab to see a comprehensive list of all the addresses you’ve blocked.
Unblocking a Sender in Outlook:
- To unblock a sender, simply select the email address from the list in the ‘Blocked Senders’ tab.
- Click ‘Remove’ to unblock them. This will allow their emails to once again find their way to your inbox.
Pro Tips for Managing Blocked Senders
Tip #1:Regularly audit your blocked senders list to catch any mistakes. Sometimes it can so happen that important contacts accidentally land on your blocked list. Set a reminder to review this list every few months to ensure that no critical emails are being inadvertently blocked.
Tip #2:Use custom rules to manage your inbox more effectively. Instead of outright blocking, consider setting up specific filters for frequent senders. For example, you can automatically move certain emails to a dedicated folder, keeping your inbox clutter-free while still allowing you to review those messages when needed.
Wrapping Up
Blocking unwanted or spammy emails to keep your Outlook clean is a rather easy task. If you have been following the above steps well, then you can easily bring your inbox to order such that only the messages you wish to read get through.
But, remember you also need to maintain the blocked list, which is, I believe, is as essential as the act of blocking itself.
Time to clear out some much-needed space in your Outlook inbox!


