How to Organize Emails In Outlook

Table of contents
Opening your laptop and logging into a cluttered inbox has to be one of the worst ways to start your day.
It just means you’ll be spending a good chunk of your time sorting through all the emails and separating them by priority, type, and more. And all of this has to be done before you can even start responding to these emails.
What’s even worse is that an unorganized inbox can sometimes cause you to overlook important emails, resulting in missed deadlines and opportunities.
Thankfully, email clients like Outlook offer some powerful features that can help you bring your inbox clutter to zero and make it easier for you to manage your communications.
If you’re an Outlook user, read on to find some practical tips and tricks to organize your emails so you can improve your productivity and focus on tasks that actually matter.
Table of Contents
- 9 Ways to Organize Your Outlook Inbox
- 1. Create folders for different types of emails
- 2. Create rules to move emails to specific folders
- 3. Use categories to quickly identify emails
- 4. Flag emails with important to-dos
- 5. Use search folders
- 6. Archive older emails
- 7. Use the ‘Focus Inbox’ for more important emails
- 8. Regularly unsubscribe from unnecessary emails and block spam
- 9. Review your folders, categories, and rules periodically
- Bringing it All Together
9 Ways to Organize Your Outlook Inbox
An organized inbox is the key to better productivity. Here are nine ways you can get there.
1. Create folders for different types of emails
The first thing to do is to sort incoming emails into different categories based on their type, sender, and importance.
The best way to do this is to create folders and sub-folders in your Outlook inbox. For instance, there can be a folder for all emails related to ‘Project A’, a folder for emails from ‘Client B’, or a folder for ‘Urgent Emails’.
Creating such folders is quite easy in Outlook.
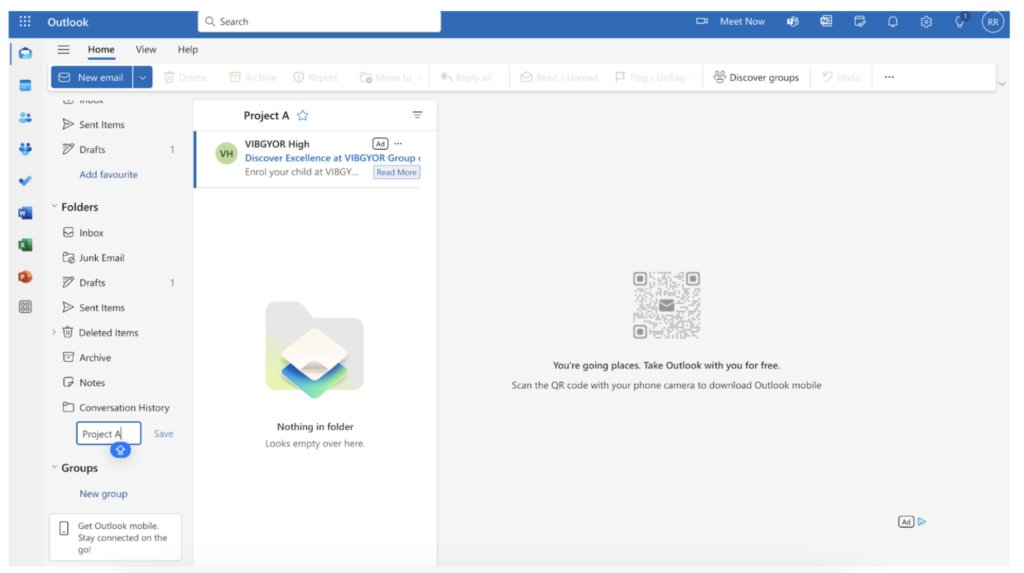
- Open your inbox and on the left navigation panel, go to Folders >> Create New Folder.
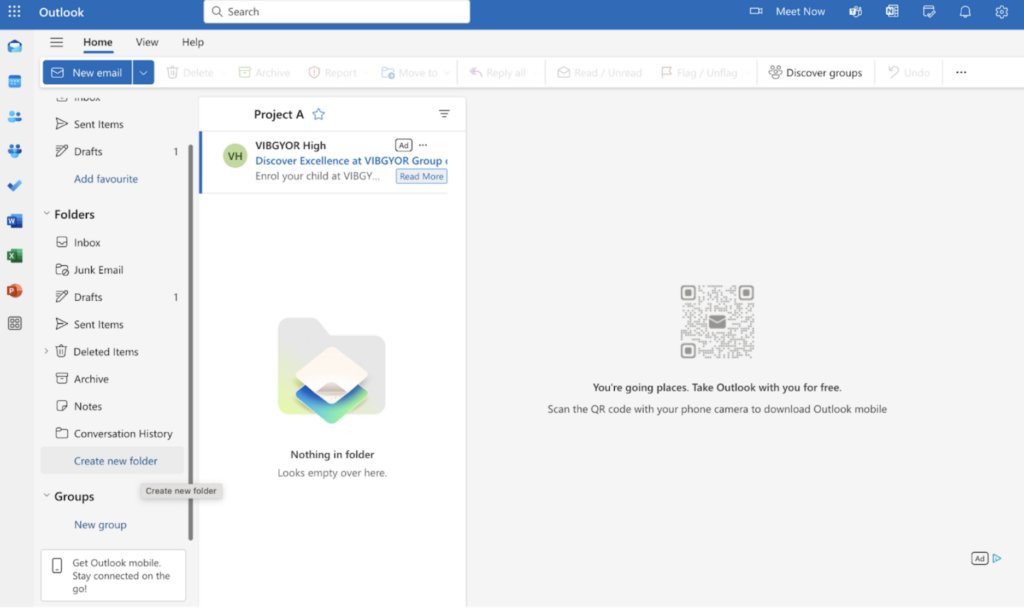
2. Give your folder a name. Remember to not use any existing names and keep it relevant to the kind of emails you want to organize within the folder. Let’s say you name your folder ‘Project A’ to represent all emails received for a project you’re working on.
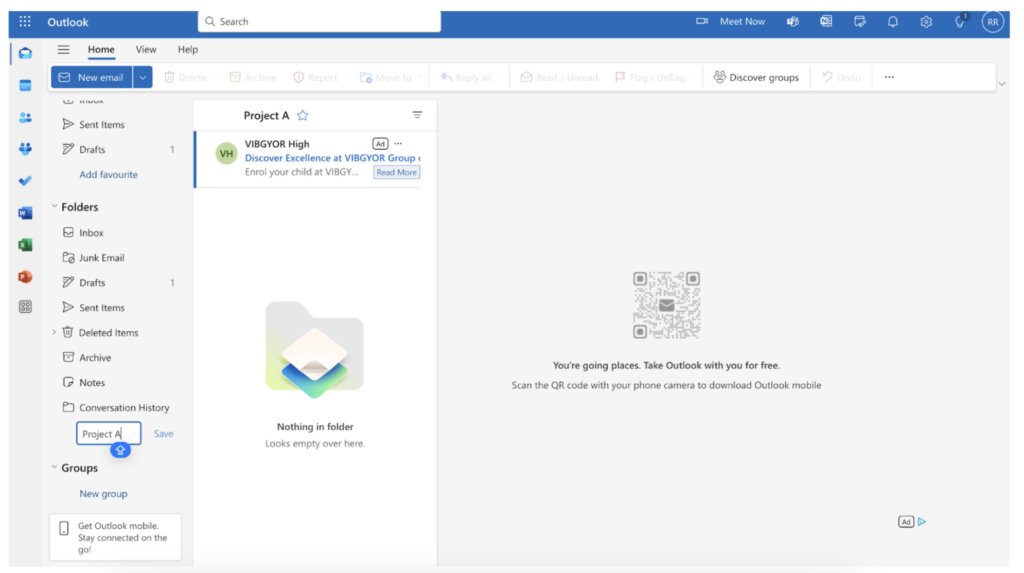
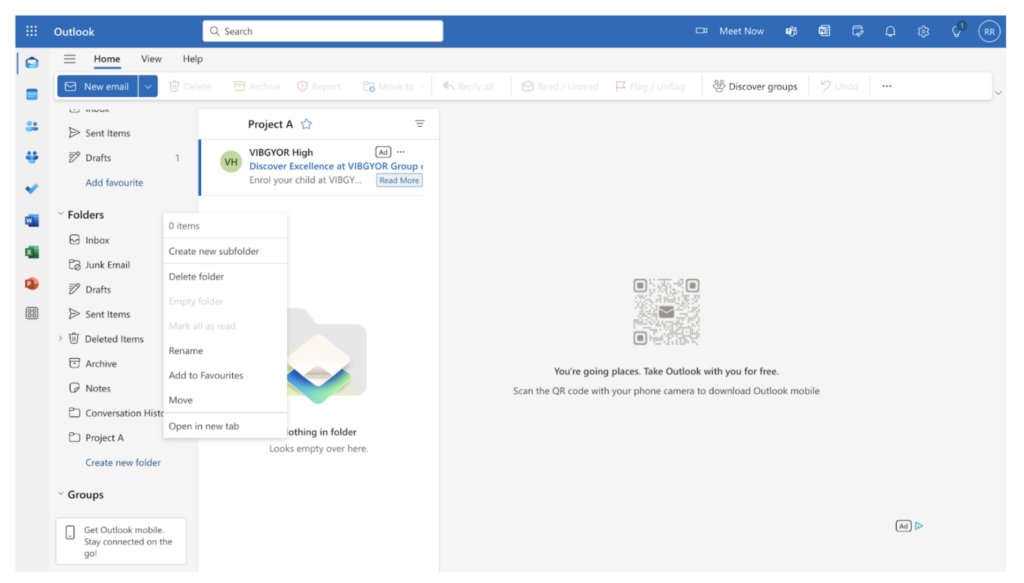
3. Now, hover your mouse over the new folder and you will see three dots appear. Click the button and choose ‘Create New Subfolder’.
4. You can create as many sub-folders as you need to organize the different types of emails in the main folder. For instance, ‘Project A’ can have sub-folders to sort emails under ‘Planning’, ‘Initiation’, or ‘Review’.
2. Create rules to move emails to specific folders
Once you’ve created folders and sub-folders for your emails, you need to define rules so that incoming emails are automatically moved into a specific folder.
In Outlook, you can define rules based on criteria such as sender, subject, or keywords.
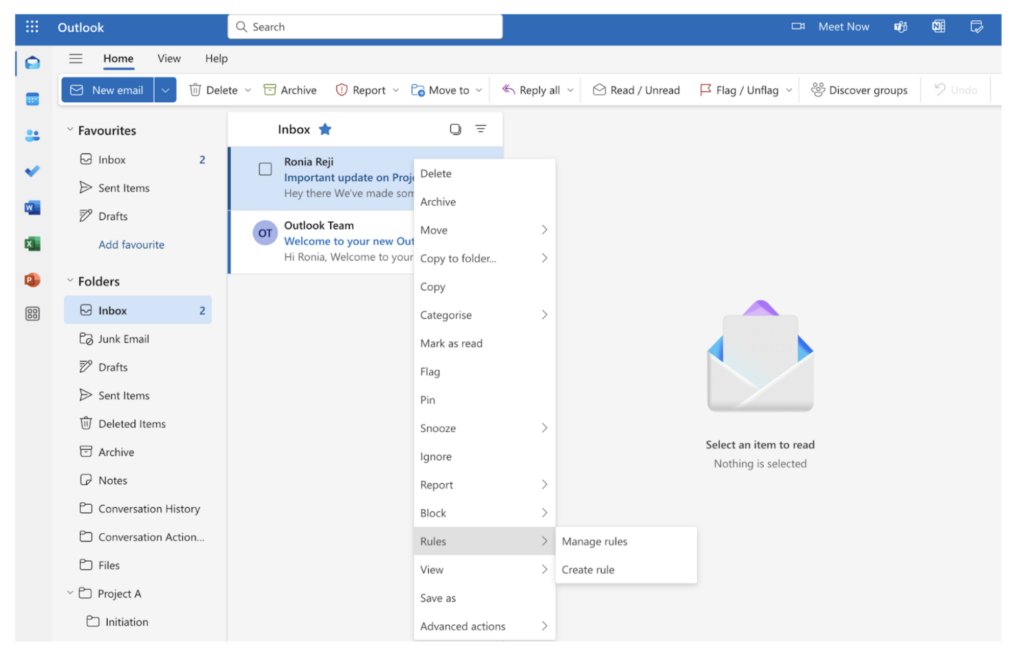
1. To create rules, right click on an email and navigate to Rules >> Create Rule. Choose ‘Manage Rules’ to edit or delete an existing rule.
2. A pop-up will open that gives you the option to move emails from a specific sender to a folder.
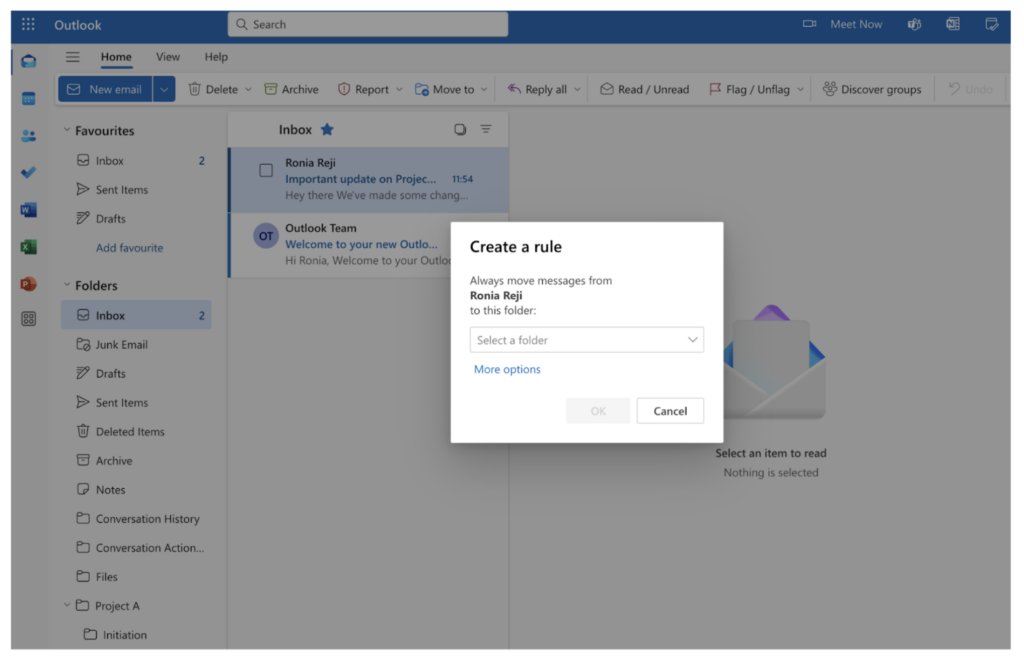
3. For configuring advanced rules, choose ‘More Options’ and you can define specific rules to further categorize an incoming email into a folder and the relevant subfolder.
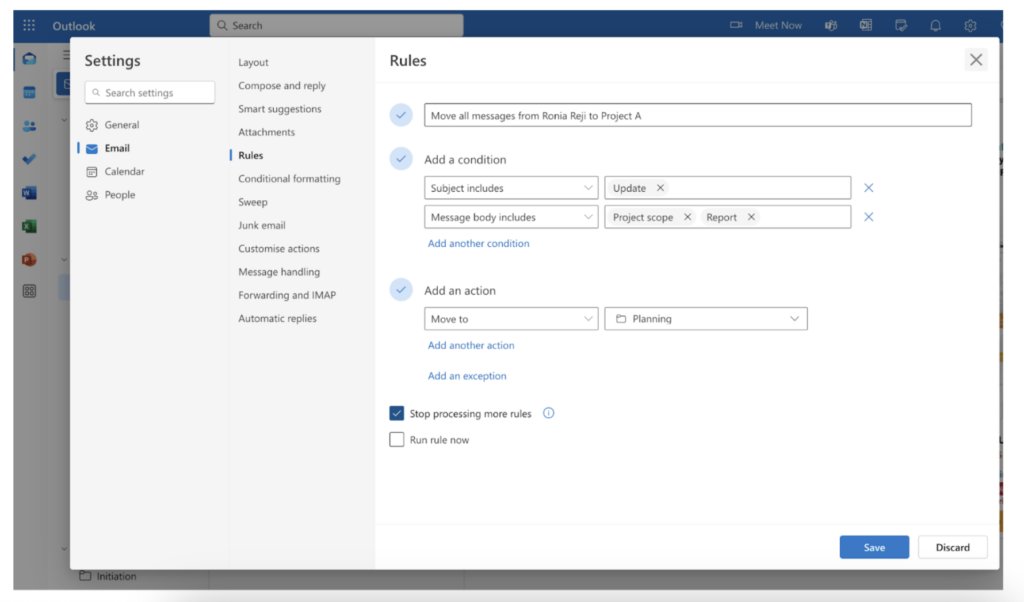
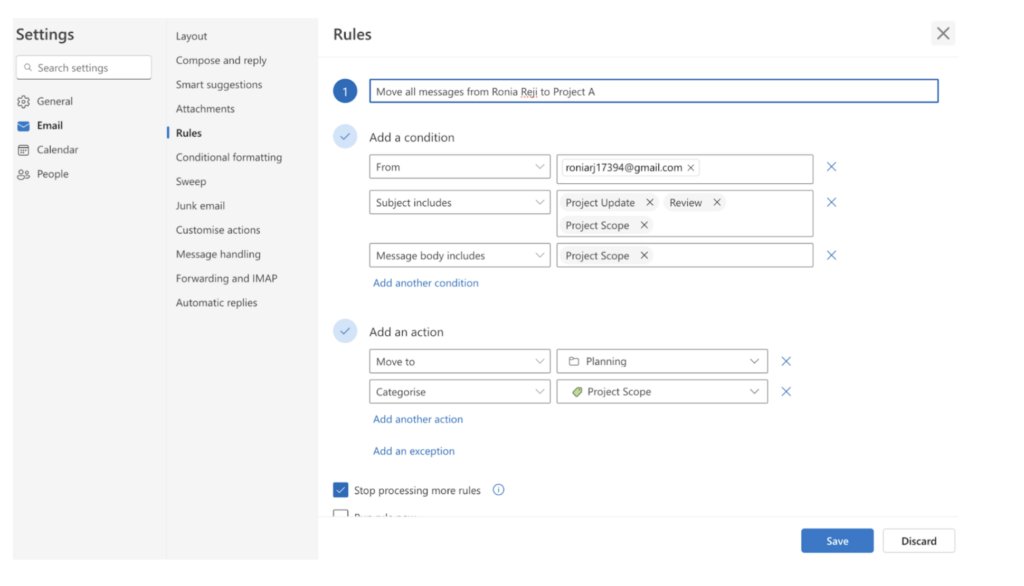
For instance, let’s define a rule by which incoming emails from a particular sender are routed to the folder named ‘Project A’. Then, we can define an advanced rule by which if the email subject line contains the keyword ‘update’ and the message body contains the keyword ‘Report’, route it to to sub-folder named ‘Planning’.
Here’s a quick look at configuring advanced rules.
3. Use categories to quickly identify emails
Assigning emails to specific categories makes it easier to identify and prioritize your incoming messages. For instance, let’s say a client emails you on an urgent matter relating to a project you’re managing for them. In this case, you can categorize the email under three segments – name of the project, the client it’s from, and the urgency of the request. So the email will be categorized under ‘Project A’, ‘Client A’, and ‘Urgent’.
Categorizing emails allow you to filter and sort through them so that you can quickly retrieve and access critical information.
In Outlook, categories have colors associated with them and this makes it even easier to find all emails related to one category. For instance, use red to color code the category ‘Urgent’.
Here’s how you can define categories for emails in Outlook.
1. Navigate to ‘Categorize’ located at the top panel (also called Outlook Ribbon) of your inbox window.
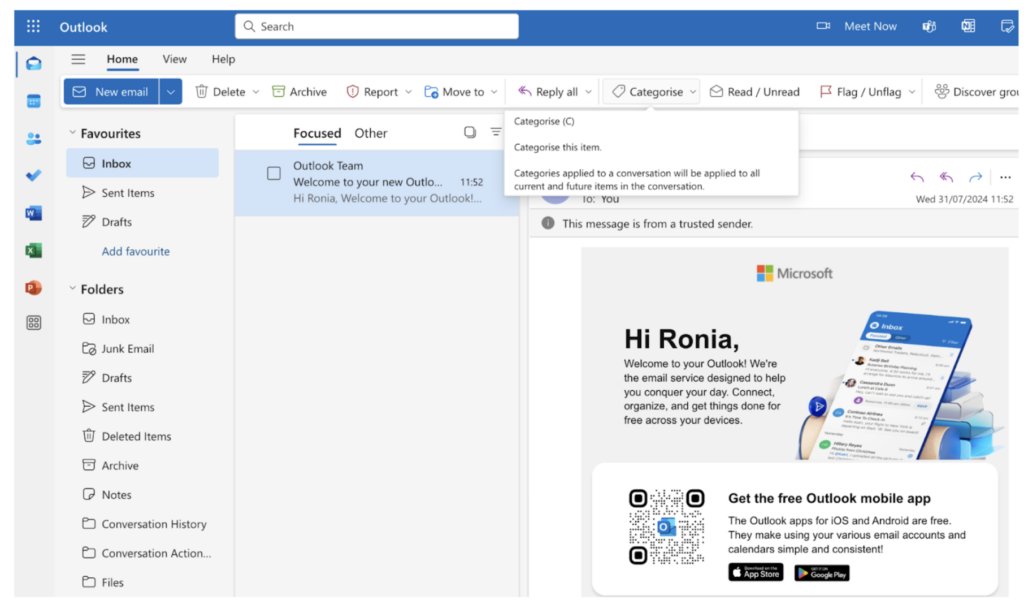
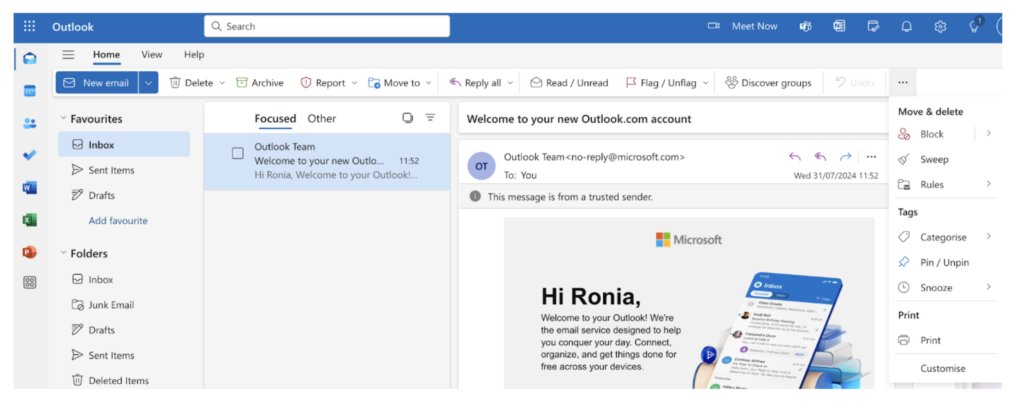
2. If you can’t find the option in the Outlook Ribbon, click on the three dots in the right corner of the Outlook interface and choose ‘Categorize’.
3. You will find a list of color coded tags with generic names such as Blue category, Yellow category, and so on. If you plan to go ahead with these, click ‘Manage categories’ and edit the name to your liking. For instance, you can change the name Green category to ‘Project Scope’.
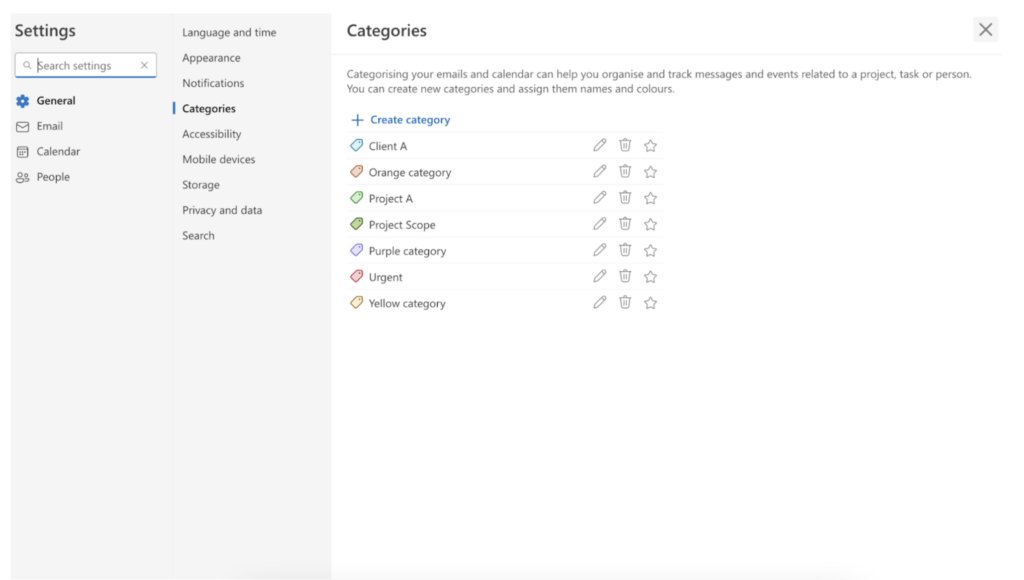
4. You can also create a new category and choose a different color to represent it.
How to apply categories to incoming emails
1. Once you’ve defined your categories, go back to Rules and choose ‘Manage Rules’.
2. When the pop-up opens, under ‘Add an action’, choose ‘Categorise’, and select the category you want to apply. In this case, we can apply the category ‘Project Scope’ to all emails in which the message body contains the keyword ‘Project Scope’.
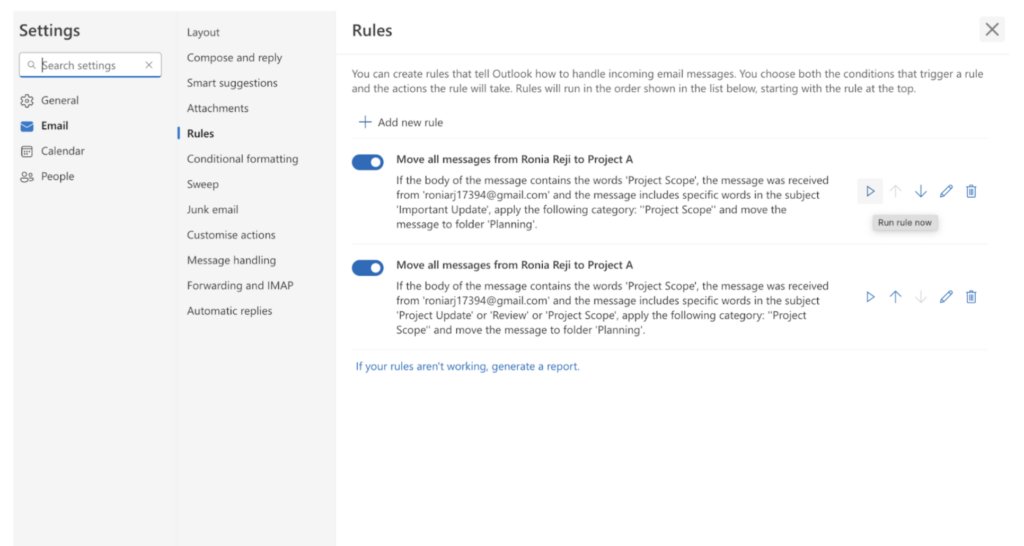
3. After you save the changes, you will be taken to ‘Settings’. Click the play button next to the rule you’ve configured to start categorizing incoming emails.
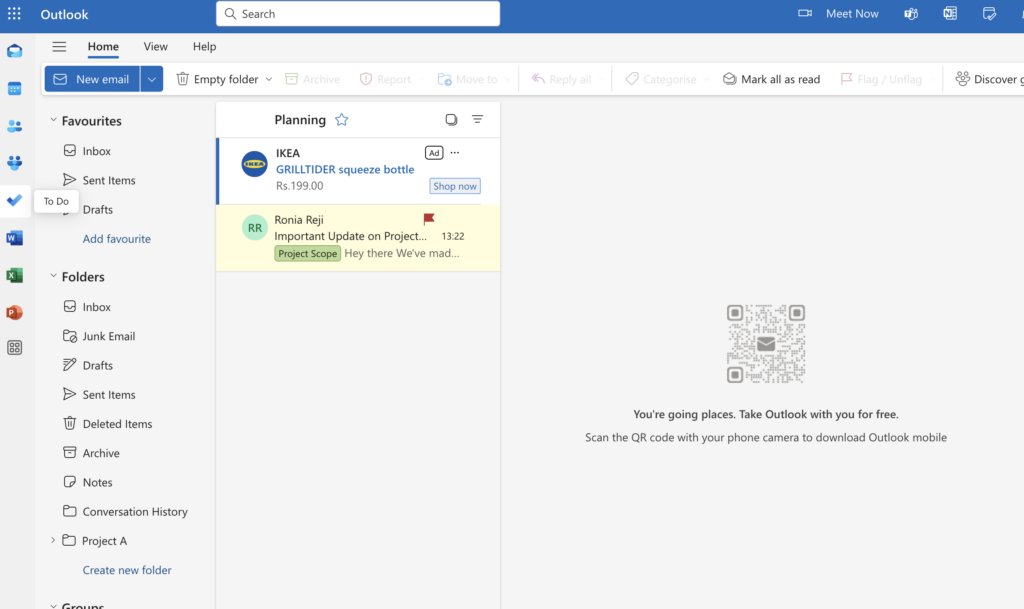
Now all emails from your client will be routed to the folder named Project A, under sub-folder Planning and assigned a green tag to show you that the message is categorized under Project Scope.
4. Flag emails with important to-dos
When you’re going through new emails in your inbox, there may be certain messages that require a follow-up email or certain action items. But what if you’re only planning to complete these tasks later? How do you keep track of what needs to be done?
In this scenario, Outlook allows you to flag emails with action-items.
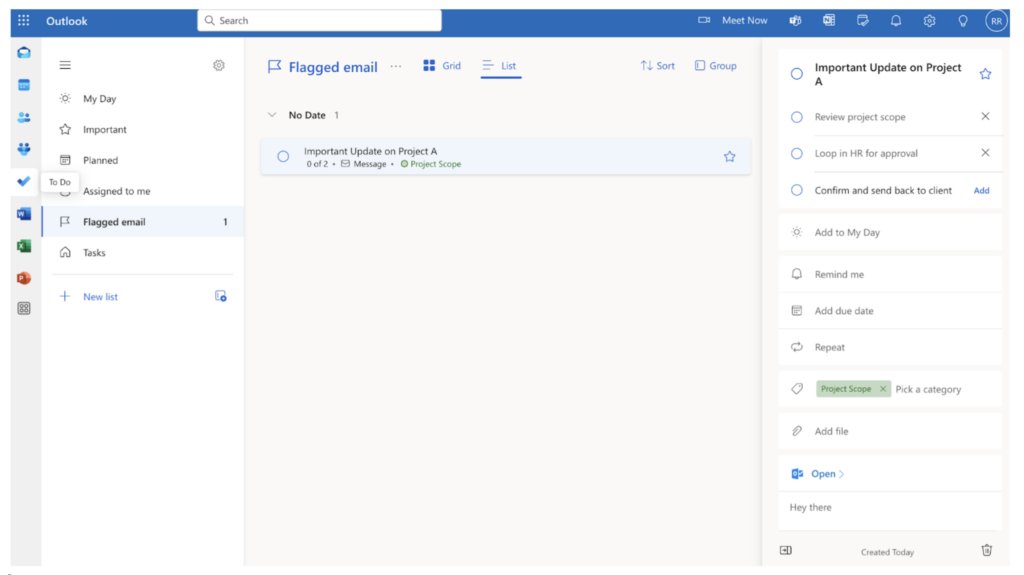
Flagged emails are automatically organized in your To-Dos. This way emails that need a specific action appear in your task list and nothing falls through the cracks.
For each task, you can add a note for context, set reminders, assign due dates, and even add steps to indicate other sub-tasks.
Here’s how you can flag an email in outlook.
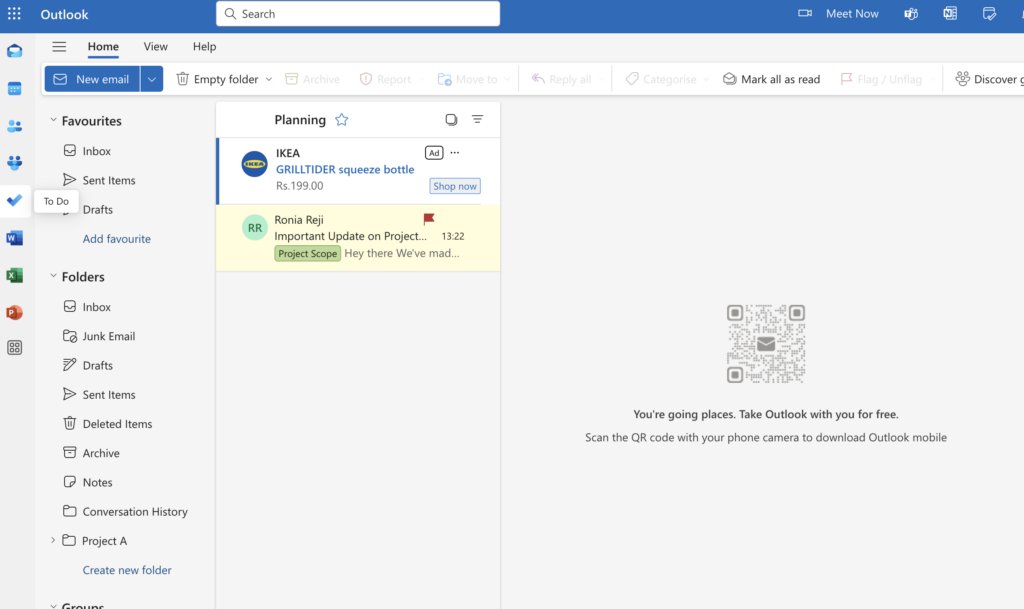
- Click the flag icon on the email you want to add to your to-dos. You will notice that the icon immediately turns red.
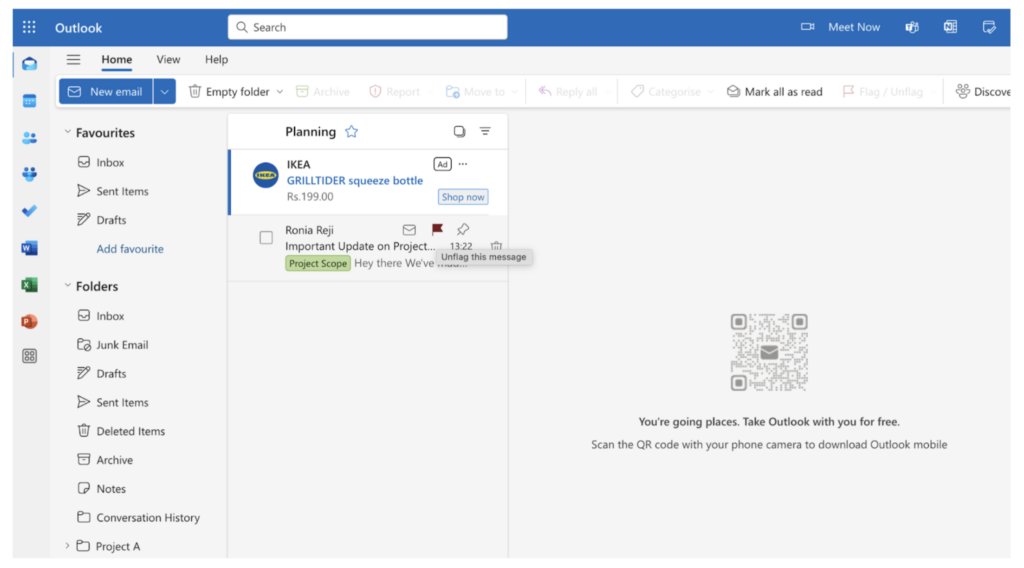
2. Now navigate to ‘To-Do’ in the left panel and choose ‘Flagged Emails’.
3. Click the email and add relevant details on the panel that opens up on the right.
5. Use search folders
Search folders can be used to view messages based on certain search criteria. It brings together all emails that match the specific criteria even if these messages are saved across different folders in your inbox. You can create search folders for unread messages, emails from a specific client, or to view conversations from your team. These folders will be dynamically updated every time a new email comes in, enabling you to quick access certain types of conversations.
To create search folders:
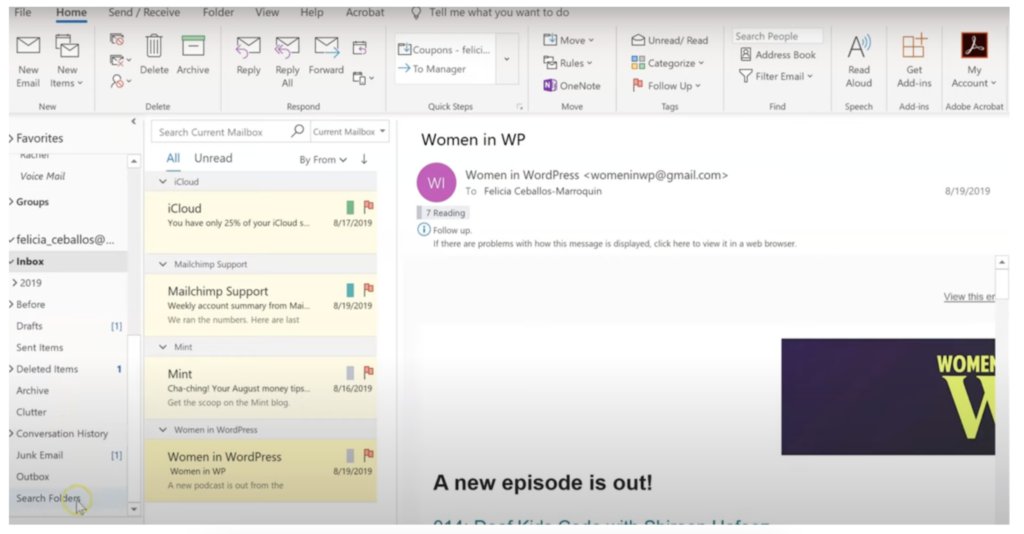
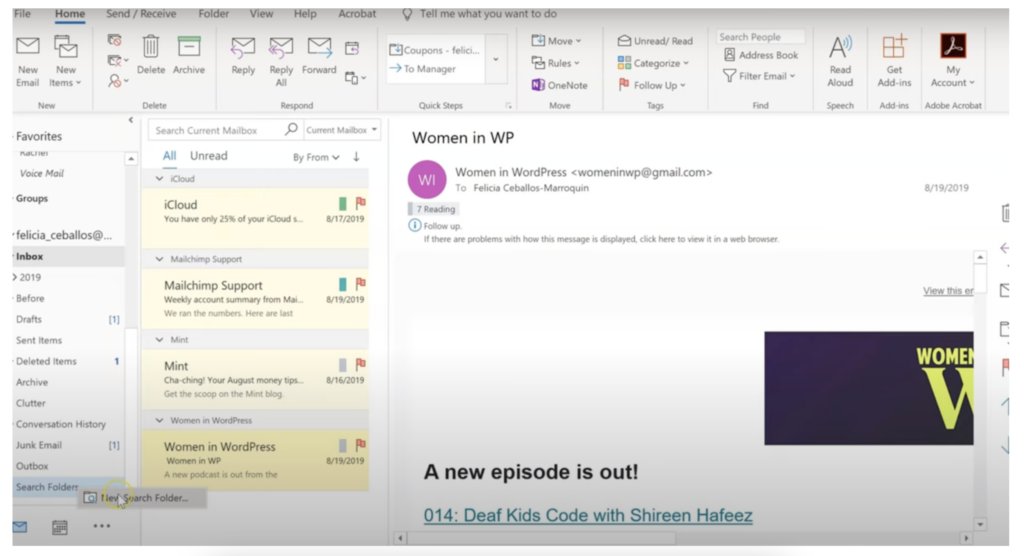
1. Select ‘Search folders’ from the left navigation panel.
2. Right click and choose ‘Create New Search Folder’.
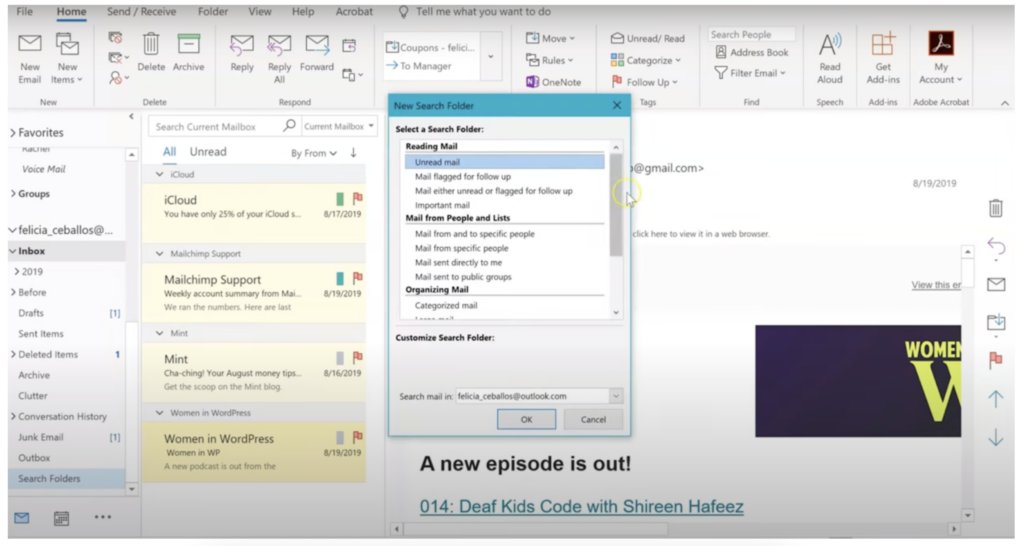
3. A pop-up window will open up and you can find several criteria based on which you can define your search folder. If you want to see emails from a sender, choose the option ‘Mail from Specific People’.
4. Enter the email ID of the person you want to view emails from in the field marked ‘Show email received from’ and then click OK.
5. You will then be directed to a folder that gives you a single view of all emails from a specific sender.
6. Archive older emails
Keep your inbox clutter-free by archiving old emails. This way you can focus on current and relevant communications and not be distracted by messages that don’t require your involvement anymore or are already resolved.
But, archiving emails one by one can be quite painstaking right?! The good news is that Outlook offers an option to auto archive older messages.
1. Click on your primary inbox, then go to ‘File’ in the Outlook Ribbon.
2. Navigate to Options >> Advanced and you will see ‘AutoArchive Settings’ as one of the options.
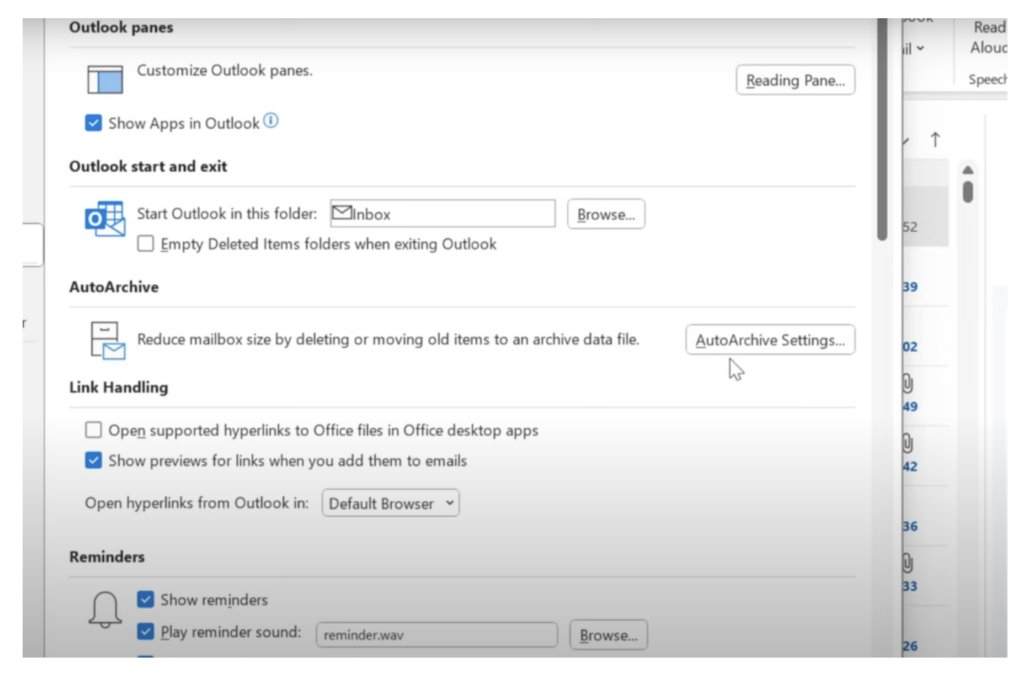
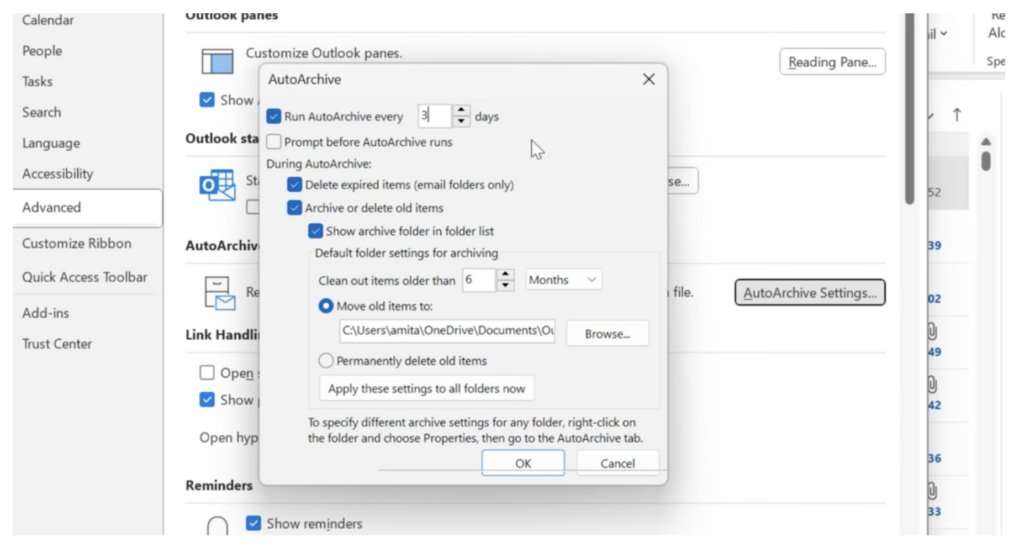
3. Choose Auto Archive and change the settings to suit your preferences. For instance, you can adjust the settings in such a way that emails older than 6 months are archived every 30 days. You can check the box next to ‘Prompt before AutoArchive runs’ to receive an alert before emails are archived.
7. Use the ‘Focus Inbox’ for more important emails
The Focus Inbox is used to separate important messages from the unimportant ones. Emails such as newsletters, promotions, notifications, and other unimportant messages are sent to an inbox named ‘Other’.
If you want to enable the Focused Inbox:
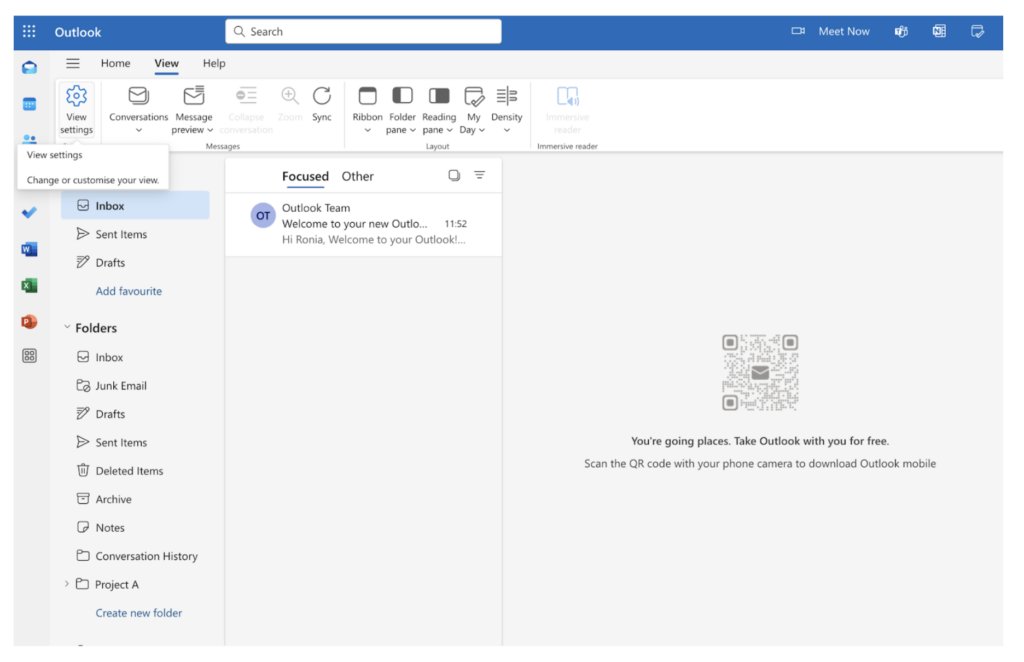
1. Navigate to ‘View’ in the Outlook Ribbon and choose ‘View Settings’.
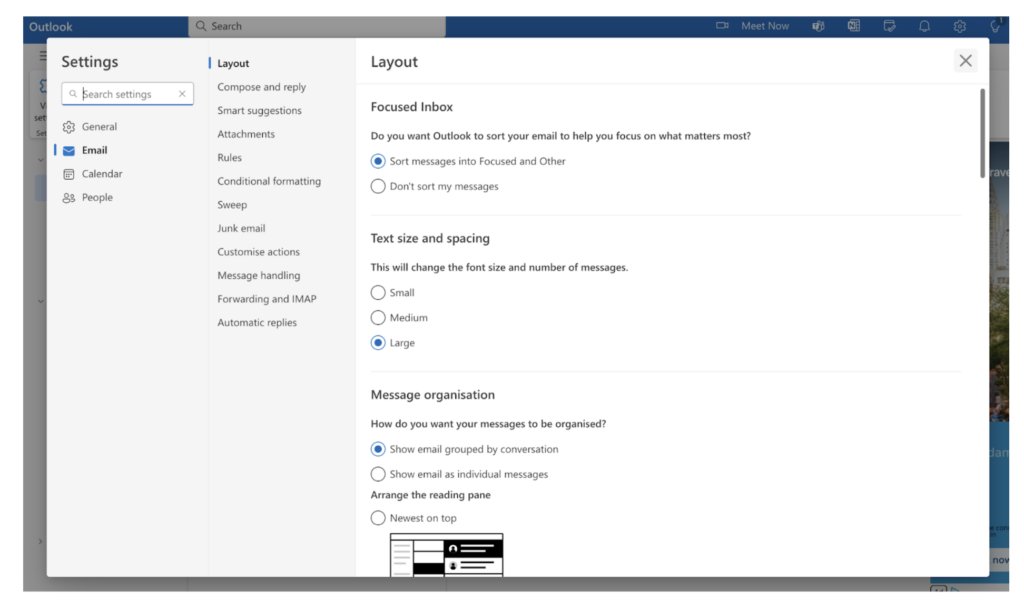
2. Then go to Email >> Layout.
3. Under ‘Focused Inbox’, choose ‘Sort Messages into Focused and Other’ to enable Outlook to sort your incoming emails.
8. Regularly unsubscribe from unnecessary emails and block spam
A handy tip to avoid a cluttered inbox is to review your inbox for unnecessary emails and spam. Check your spam folder every day or even once every two weeks – whichever is best suited for your specific needs and email volume.
To unsubscribe from an email in Outlook:
1. Click the email or newsletter you want to unsubscribe.
2. Scroll all the way to the bottom of the email. At the bottom you will see an option to unsubscribe to emails from the particular business. Click on it and follow the instructions.
To keep your email account secure, you may also need to check your inbox for spam and block emails that look suspicious.
9. Review your folders, categories, and rules periodically
While Outlook offers plenty of options to keep your inbox organized, you may want to consider reviewing your rules and categories every month or so.
Chances are that you may receive emails that may not fit the existing categories. This makes it necessary to make adjustments to your rules so that new types of emails can be organized effectively.
Bringing it All Together
Organizing your emails is important for staying productive and streamlining your daily workflow.
You can leverage various features in Outlook to effectively manage incoming emails, ensuring everything is properly categorized and filed, and that important messages are always within reach.
Whether you’re managing a personal, professional, or project-related inbox, the tips above, along with the best email management software, can significantly reduce the time you spend organizing your inbox and help you stay on top of important communication


