


How To Create Jira Tickets From Your Email? (Step-by-step Guide)


Table of contents
When you think of tracking client issues and managing projects, Jira is one of the first tools that come to mind.
Jira has been around for over two decades and has cemented itself as a reliable and effective piece of software. Today, it comes with many critical features that help teams across the organization collaborate on issues and resolve them faster.
One such feature is the ability to create Jira tickets directly from emails.
Think about it: your clients and other internal teams are sending you emails on product queries, bug reports, or new ideas. Manually copying all that into Jira can get tedious and lead to mistakes.
However, with Jira’s email integration, you can automate this process and continue to focus on streamlining and prioritizing all incoming requests.
In this guide, I’ll walk you through how to set up Jira so it creates tickets straight from emails.
Table of Contents
- Why Create Jira Tickets from Email?
- Understanding Jira’s Email Integration Features
- Step-by-Step Guide to Setting Up Jira’s Email Integration
- Formatting Emails for Jira Ticket Creation
- Agile Task Management with Hiver-Jira Integration
- Conclusion
Why Create Jira Tickets from Email?
Creating Jira tickets directly from emails can simplify how teams manage tasks, track issues, and stay organized. Here’s why this feature can be so valuable:
1. It helps centralize task management across communication channels
Teams often receive important requests, bug reports, or ideas through email, especially from clients or stakeholders who may not have direct access to Jira. Instead of manually copying the details into Jira, email-to-ticket conversion allows tasks to be automatically captured without needing to switch between tools.
2. It minimizes manual data entry and human errors
Manually entering data from email to Jira can lead to mistakes. It might so happen that you miss out on some details, file the issues under the wrong category, or worse – forget creating the ticket itself. You reduce the risk of such errors by automation the process of creating Jira tickets from emails.
3. Provide faster responses to critical issues
When you receive high-priority emails on security alerts or urgent bugs, it’s important to take immediate action. By using Jira’s email integration, you can automatically create and prioritize tickets based on predefined rules, ensuring that critical issues are addressed quickly.
Let’s say a support engineer receives a critical bug report via email. Jira’s email handler can recognize the priority based on the subject or keywords in the email, automatically creating a high-priority ticket and notifying the team about the same.
4. Assists in automated ticket assignment and categorization
With Jira’s email integration, you can set up automation rules that categorize tickets and assign them to the appropriate team member or department based on the email content. This eliminates the need for manual sorting and speeds up the workflow.
5. Maintain a single source of truth
Creating tickets from emails helps centralize all task management in one place—Jira. This prevents important information from being scattered across multiple platforms and makes it easier for teams to collaborate and track progress.
Like, instead of having tasks hidden in various email threads, everything gets logged as Jira tickets. The whole team can then easily track the status of each task, add comments, and collaborate directly within Jira, keeping everyone aligned.
6. Keep email records linked to Jira tickets
One advantage of using email to create Jira tickets is that you maintain a connection between the original email and the ticket. This means any follow-up communication or additional details sent via email can be automatically added to the corresponding Jira ticket, keeping the conversation and task history in one place.
Understanding Jira’s Email Integration Features
Jira offers built-in capabilities to automatically create tickets from emails, streamlining the process of capturing and tracking work within your helpdesk ticketing system. Here’s what it does:
Automatically creating issues from emails
Jira’s email integration enables the automatic creation of issues based on incoming emails. When an email is sent to a specified email address, Jira can parse the email’s subject and body to create a new issue and populate the corresponding fields.
Supported email types
Jira’s email integration can process emails from various sources, including:
- Emails from licensed Jira users
- Emails from anonymous users (i.e., those without Jira accounts)
- Emails forwarded or sent to the configured email address
Customizing email-to-issue mapping
Jira allows you to customize how email fields are mapped to issue fields. By default, the email subject is used as the issue summary, and the email body becomes the issue description. However, you can configure more advanced mappings using Jira’s mail handlers.
Mail handlers enable you to specify rules for processing incoming emails:
- Populate custom fields based on email content
- Assign issues to specific teams or individuals
- Trigger specific actions based on email content
Best Jira alternative for customer support
Step-by-Step Guide to Setting Up Jira’s Email Integration
Here’s a detailed guide on how to create Jira tickets via email and set up email handlers.
(A) How to configure Jira to accept emails for ticket creation
These are the steps you need to follow:
1. Access Jira administration:
- Log in to your Jira instance with administrative privileges.
- Navigate to the Administration area.
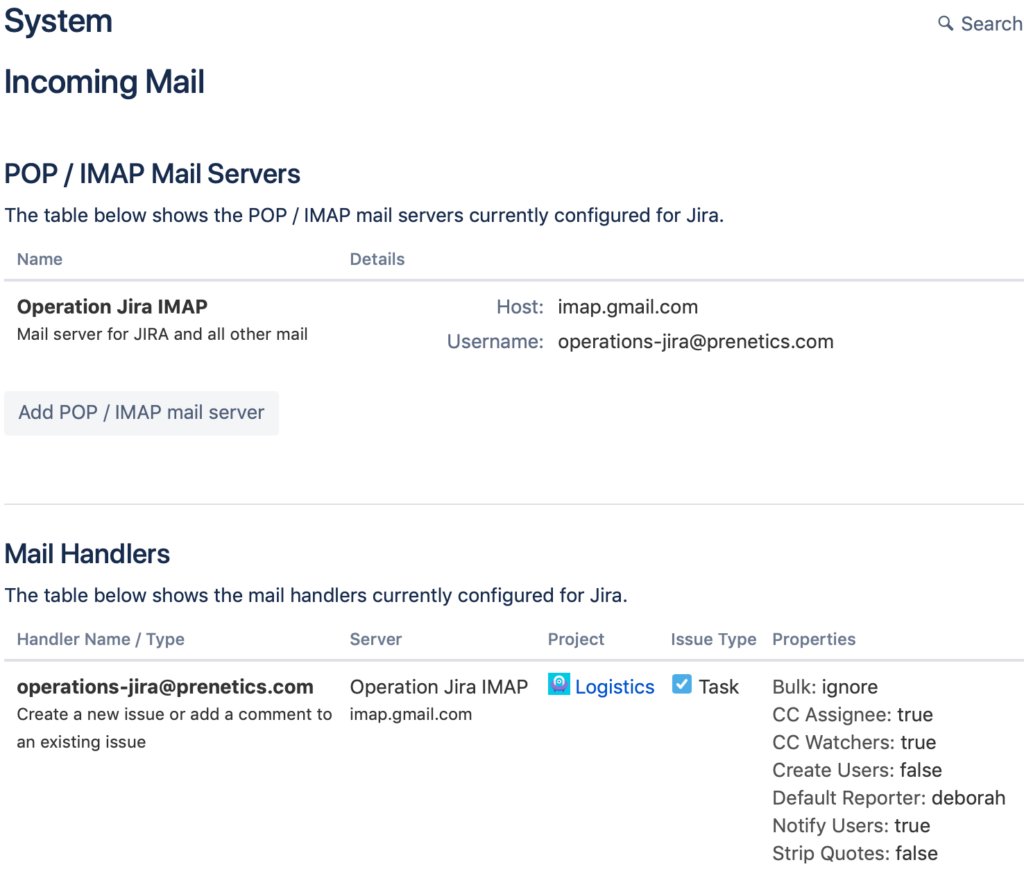
2. Set up incoming mail server:
- Go to System > Incoming Mail.
- Click on “Add Incoming Mail Server.”
- Fill in the required fields:
- Name: Provide a descriptive name for the mail server.
- Protocol: Choose between POP, IMAP, or Microsoft Graph API, depending on your email provider.
- Host name: Enter the mail server’s hostname (e.g., imap.yourcompany.com).
- Port number: Use default ports (e.g., 110 for POP, 143 for IMAP) or specify custom ones.
- Username and password: Enter the credentials for the email account Jira will use to access the mail server.

3. Enable secure connections: If your email server supports SSL, ensure to select the secure protocol (e.g., SECURE_POP or SECURE_IMAP) for encrypted communication.
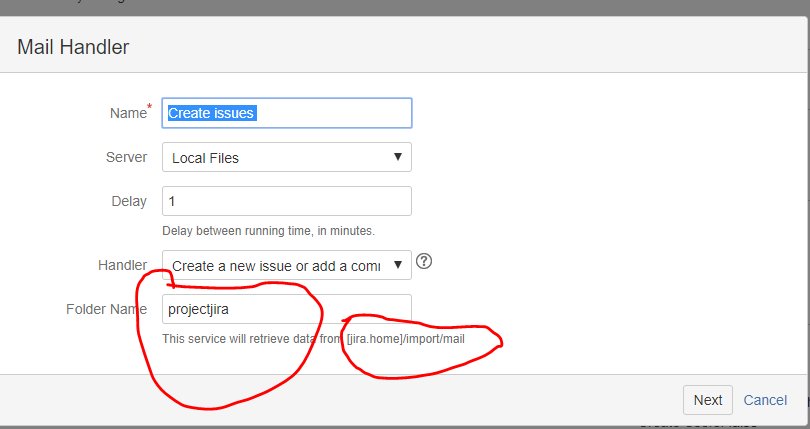
4. Configure mail handlers:
- After setting up the mail server, navigate to Mail > Incoming Mail.
- Click on Add incoming mail handler.
- Provide a name for the handler and select the previously configured mail server.
- Specify the folder from which to read emails (typically the inbox).
- Define the delay in minutes for how often the handler checks for new emails.
5. Define mail handler options:
- Choose the type of mail handler (e.g., create issues or comments).
- Set any additional options specific to the handler you selected.
- Click Add to save the handler.
(B) Setting up email handlers in Jira
Once the mail server is connected, you’ll need to configure email handlers that define how Jira processes incoming emails and converts them into tickets.
Step 1: Create a new email handler
- After connecting the mail server, navigate to Mail Handlers under the Incoming Mail section.
- Click on Add Mail Handler to create a new handler that will process emails and create tickets.
Step 2: Choose an email handler type
- Jira provides several options for handling emails, including creating new issues or adding comments to existing issues.
- The most common option is Create a New Issue or Add a Comment to an Existing Issue.
Step 3: Define email handling rules
Define how the handler will process incoming emails. For example:
- Issue creation: Specify that new issues should be created based on the email’s subject and body.
- Add comments: If an email references an existing issue by key (e.g., “JIRA-1234”),Jira can automatically add the email content as a comment on the existing ticket.
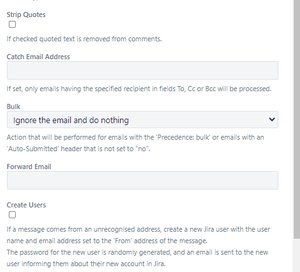
Step 4: Set email filtering options
Configure the handler to ignore certain emails, such as auto-replies or emails from specific senders, by adding filters.
Step 5: Set project mapping
Select the Jira project where the tickets should be created. This ensures that emails are routed to the correct project and associated with the appropriate workflows.
Step 6: Save and test the handler: Once everything is set, save the handler and send a test email to verify that it correctly creates tickets or comments in Jira.
Email handlers in Jira (IMAP vs. POP3)
1. IMAP: Allows multiple devices to access the same mailbox, keeping emails synchronized across all devices. This is ideal for teams that need to access emails from different locations.
2. POP3: Downloads emails to a single device, which may not be suitable for teams needing shared access.
(C) Permissions and email security considerations for integration
This is what you need to consider:
- Set up permissions to ensure that only authorized users or email addresses can create tickets or add comments. This is particularly important if your email handler is open to receiving external communications.
- Use Jira’s Permission Schemes to control who can create issues or add comments via email.
- To prevent spam or unwanted emails from creating tickets, configure email filters or restrict ticket creation to specific email domains.
- Jira’s email handler allows you to define rules that ignore or reject auto-generated emails, like out-of-office replies or marketing messages.
- Make sure that mail server connection is secure by using SSL/TLS encryption for IMAP or POP3 protocols. This will protect the data transmitted between Jira and the email server.
- Use strong authentication methods for connecting to your mail server. If possible, implement OAuth or multi-factor authentication (MFA) to secure the integration.
Formatting Emails for Jira Ticket Creation
When clients reach out to a company that uses Jira, proper formatting is essential for creating tickets from emails. Here are some guidelines:
1. Subject line formatting
- The subject line of the email becomes the issue summary in Jira. It should be concise yet descriptive enough to convey the main issue or request.
- Use keywords that reflect the nature of the ticket, such as “Bug Report,” “Feature Request,” or “Support Needed.” This helps in quickly identifying the ticket’s purpose.
Note:
1. If your subject line includes priority keywords like “urgent,” “bug,” or “feature request,” it helps Jira’s automation rules or your team immediately assign importance to the ticket.
2. By including the key area or project in the subject line, the ticket can be routed to the appropriate team.
3. A well-structured subject line makes it easier to search for and filter tickets later on. Vague subject lines like “Problem” or “Need Help” make it difficult for teams to find or categorize the ticket.
2. Body text formatting
The body of the email translates into the description of the Jira issue. It should include all relevant details, such as:
- A clear explanation of the issue or request.
- Steps to reproduce a bug, if applicable.
- Any relevant background information that can assist in understanding the context.
- Use bullet points or numbered lists for clarity, especially when outlining steps or requirements.
3. Avoid rich text limitations
Currently, Jira converts email content to plain text, which means any rich text or HTML formatting will be lost. Therefore, avoid relying on bold, italics, or colors to emphasize points. Instead, use clear language and structure to convey importance.
Here’s an example:
Subject: “Bug: Unable to Submit Order on Checkout Page”
Hi team,
We are experiencing an issue with the checkout page. Below are the details:
Summary: Users are unable to complete orders due to a “Submit Order” button malfunction.
Steps to reproduce:
1. Add items to the cart.
2. Proceed to the checkout page.
3. Click “Submit Order.”
Expected behavior: The order should be submitted successfully.
Actual behavior: The button becomes unresponsive, and no order is submitted.
Priority: High (this is affecting live transactions).
Please investigate this issue as soon as possible.
Thanks,
[Your Name]
4. Best practices for attachments and links
Here are some best practices to follow:
- Make sure attachments are not excessively large, as this can slow down Jira processing or email delivery. It’s better to compress files. For example, instead of attaching a large 100MB log file, attach a compressed ZIP file or provide a link to the file hosted in cloud storage.
- Give attachments descriptive filenames so that they are easy to identify in the Jira ticket. Instead of “screenshot.png,” name the file “PaymentErrorScreenshot.png.”
- Inline images can be useful for illustrating visual issues (e.g., UI bugs),but avoid overloading the email with too many images. Keep the most critical screenshots inline for easier viewing in the ticket.
- When linking to external resources (e.g., bug reports, documentation, or logs),ensure the URLs are directly accessible to the ticket reviewer and are clearly labeled.
- If the reviewer needs special access to view the linked content (e.g., logging into an account),provide those instructions.
Agile Task Management with Hiver-Jira Integration
Integrating Jira with email is a great way to manage tasks efficiently, but teams may encounter various issues, such as:
- Sometimes the same email creates multiple Jira tickets, leading to duplicate issues that clutter the project.
- Jira has a maximum file size limit for attachments. If an attachment exceeds this limit, it won’t be added to the ticket.
- If you are using Jira’s automation rules to assign tickets based on email content, make sure the rules are correctly configured. Tickets created from emails may get assigned to the wrong team or category.
One way to sidestep these limitations would be to try out the Hiver-Jira integration. This integration bridges the gap between managing external or internal email communication and using Jira for project management or issue tracking.
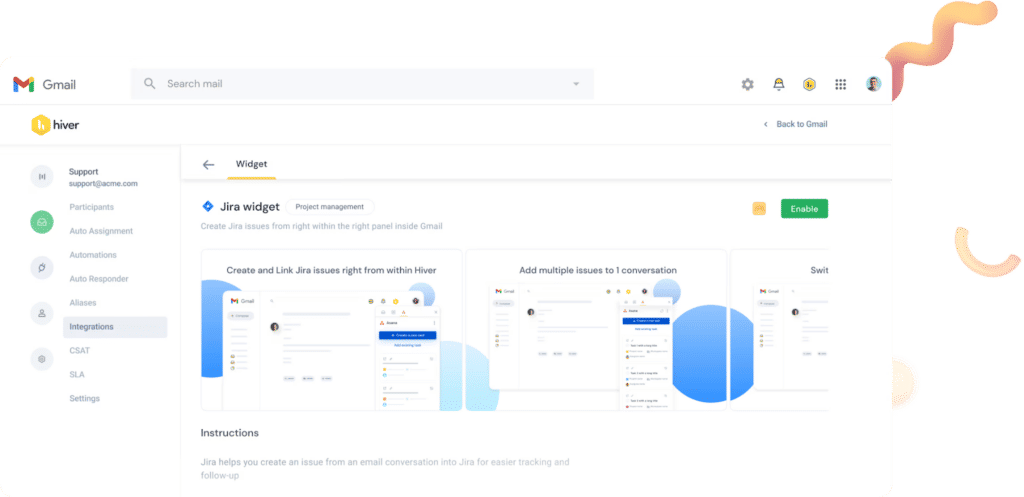
The Hiver-Jira integration simplifies the process of creating Jira tickets from emails without leaving your inbox. When integrated, Hiver allows users to:
- Create Jira tickets from Gmail: Users can quickly convert any email into a Jira issue without manually entering data into Jira.
- Custom field mapping: Map email content (subject, body, etc.) directly to fields in Jira, ensuring all necessary details are automatically populated in the ticket.
- Assign, track, and manage tickets: Team members can view, track, and manage Jira issues directly from their inbox, without needing to switch between tools.
- Attach files and emails: Attach important email conversations or files directly to the Jira ticket, ensuring that context is not lost.
Here’s a quick comparison:
| Feature | Hiver | Jira Email Integration |
|---|---|---|
| Ease of setup | Doesn’t take more than an hour to set up. Manage JIRA projects from the comfort of Gmail. | Requires configuration of mail servers, handlers, and permissions, which may require technical knowledge. |
| Email-to-ticket automation | Automatically converts emails into tickets directly from the inbox. Allows ticket assignment and categorization without leaving your inbox. | Converts emails into Jira tickets based on pre-configured rules, but lacks the flexibility of in-inbox management. |
| Task assignment and collaboration | Easy ticket assignment, internal comments, and team collaboration directly in your inbox. | Tickets are created in Jira, and collaboration happens within Jira. Users have to switch between tools when they want to respond to the client via email. |
| Ticket prioritization and categorization | Offers custom workflows to prioritize and categorize tickets within Gmail. | Customization available in Jira but requires some manual setup. |
| Flexibility in tool usage | Great for teams that work primarily on email and need to manage customer or vendor communication efficiently. | Better suited for teams already deeply embedded in Jira for project management and issue tracking. |
| Collaboration features | Strong collaboration via shared inboxes, internal notes, and shared drafts. | Requires navigating Jira’s internal comment system, which is not as closely tied to email threads. |
Conclusion
Integrating email with Jira can make managing tasks much easier, whether you use Jira’s native setup or a tool like Hiver. Hiver is ideal for teams that work primarily out of Gmail and Outlook, letting you handle Jira tickets right from your inbox. On the other hand, Jira’s built-in email integration offers more flexibility for teams already using Jira for project management.
Both options help streamline workflows and keep everything organized, so the choice really depends on how your team prefers to work.
Interested in trying Hiver? Take a free trial for 7 days.